As a masking tape supplier, I've witnessed firsthand the versatility and practicality of masking tape in various applications. One of the most creative and useful ways to utilize masking tape is in creating custom - shaped window films. In this blog, I'll guide you through the process of using masking tape to achieve this unique and functional window treatment.
Understanding the Basics of Masking Tape
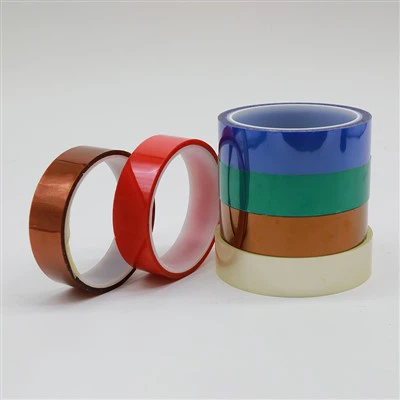
Before we dive into the process of creating custom - shaped window films, it's essential to understand the different types of masking tape available. We offer a wide range of masking tapes, each with its own unique properties and uses.
Colored Masking Tape
Colored Masking Tape is not only functional but also adds a decorative touch to your projects. It comes in a variety of vibrant colors, allowing you to create eye - catching designs on your window films. Whether you want to add a pop of color to a plain window or create a themed design, colored masking tape is an excellent choice.
UV Resistant Masking Tape
UV Resistant Masking Tape is designed to withstand prolonged exposure to sunlight without losing its adhesive properties or deteriorating. This type of tape is ideal for outdoor windows or areas where the window film will be exposed to direct sunlight. It ensures that your custom - shaped window film remains intact and looking great for a long time.
High Temperature Masking Tape
High Temperature Masking Tape is engineered to handle extreme heat conditions. If you're working on a window film project in an area with high temperatures, such as near a stove or in a greenhouse, high - temperature masking tape is the way to go. It won't melt or lose its grip, ensuring a secure and long - lasting window film application.
Step - by - Step Guide to Creating Custom - Shaped Window Film
Step 1: Plan Your Design
The first step in creating a custom - shaped window film is to plan your design. You can use a pencil and paper to sketch out your idea or use digital design tools if you're more tech - savvy. Consider the size and shape of your window, as well as the overall aesthetic you want to achieve. Whether it's a geometric pattern, a floral design, or a personalized logo, make sure your design is well - thought - out before proceeding.
Step 2: Gather Your Materials
Once you have your design planned, gather all the necessary materials. You'll need masking tape (choose the appropriate type based on your needs), window film, a utility knife, a spray bottle filled with soapy water, and a squeegee. Make sure your window is clean and dry before you start.
Step 3: Apply the Masking Tape
Carefully apply the masking tape to the window according to your design. Start by placing the tape along the edges of the shape you want to create. Use a ruler or a straight edge to ensure straight lines. Press the tape firmly onto the window to ensure good adhesion. If you're creating a complex design, you may need to cut the tape into smaller pieces and piece them together.
Step 4: Cut the Window Film
Measure the size of the area covered by the masking tape and cut the window film accordingly. Leave a little extra film around the edges to allow for trimming later. It's important to use a sharp utility knife to ensure clean cuts.
Step 5: Prepare the Window Film
Spray the soapy water onto the window surface covered by the masking tape. This will help the window film slide into place and prevent air bubbles from forming. Also, spray the back of the window film with soapy water.
Step 6: Apply the Window Film
Carefully place the wet window film onto the window, starting from one corner and slowly smoothing it out with the squeegee. Work from the center outwards to push out any air bubbles. As you go, use the squeegee to remove excess water from under the film.
Step 7: Trim the Excess Film
Once the window film is in place and all the air bubbles are removed, use the utility knife to trim the excess film along the edges of the masking tape. Make sure to cut as close to the tape as possible for a clean finish.
Step 8: Remove the Masking Tape
After trimming the film, gently remove the masking tape. Start from one corner and pull the tape slowly at a 45 - degree angle. Be careful not to damage the window film while removing the tape.


Tips and Tricks
- Practice on a Small Area First: If you're new to creating custom - shaped window films, it's a good idea to practice on a small, inconspicuous area of the window. This will help you get a feel for the process and make any necessary adjustments before tackling the entire window.
- Use a Hairdryer: If you encounter any stubborn air bubbles, you can use a hairdryer to heat the window film slightly. This will make the film more flexible and allow you to push out the bubbles more easily.
- Clean the Tape Edges: Before applying the window film, make sure the edges of the masking tape are clean and free of dust or debris. This will ensure a better seal between the tape and the window film.
Conclusion
Creating custom - shaped window films using masking tape is a fun and rewarding DIY project. It allows you to add a personal touch to your windows and enhance the aesthetic appeal of your space. As a masking tape supplier, we're committed to providing high - quality tapes that meet your needs. Whether you're a homeowner looking to spruce up your living room or a business owner wanting to create a unique storefront, our masking tapes are the perfect solution.
If you're interested in purchasing masking tape for your custom - shaped window film projects or have any questions about our products, please don't hesitate to contact us. We're here to assist you with all your masking tape needs and help you achieve the best results.
References
- "Window Film Installation Guide", available at local home improvement stores.
- "The Art of Masking Tape Crafts", a DIY magazine article.